Web中最最基本的架構就是[樹狀選單],以現在前端框架氾濫的年代,多數都已經有Tree的Component,而最需要的就是組選單的部分。
有些專案可能用寫死的,但是基本上都需要從資料庫取資料,且有些還有複雜的權限機制。
以下就簡單紀錄一個選單的樹狀選單實作,附上jsfiddle傳送門: 連結
1. 建立假資料
// [全域變數] 假資料
const mockData = [
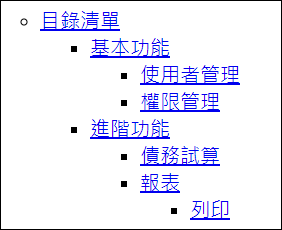
{ id: '1', parentId : '0', label: '基本功能', url: 'homepage/index' },
{ id: '2', parentId : '1', label: '使用者管理', url: 'subpage1/index' },
{ id: '3', parentId : '1', label: '權限管理', url: 'subpage2/index' },
{ id: '4', parentId : '0', label: '進階功能', url: 'homepage/index' },
{ id: '5', parentId : '4', label: '債務試算', url: 'subpage1/index' },
{ id: '6', parentId : '4', label: '報表', url: 'subpage2/index' },
{ id: '7', parentId : '6', label: '列印', url: 'subpage2/index' },
];
2. 建立 [全域變數] Menu
//  [全域變數] Menu
let globalMenuList = [];
3. 建立 產生選單的方法
/* [方法] 建立Menu */
function buildMenuTree(flatData, includeRoot = true) {
    // 定義根節點
    const root = {
        label: '目錄清單',
        id: 0,
        parentId: null,
        children: []
    };

    // 創建一個物件,以id為鍵來存放每一個節點,方便後續直接查找節點
    const nodesById = {};

    // 一次遍歷來構建nodesById和初始化節點
    flatData.forEach(item => {
        nodesById[item.id] = {
            ...item,
            // 這邊可以客製化自己的屬性
            routUrl: `Controller/${item.url}`,
            children: []
        };
    });

    // 遍歷所有節點,將它們放到適當的父節點或根節點下
    flatData.forEach(item => {
        const node = nodesById[item.id];

        if (item.parentId === '0') {
            root.children.push(node);
        } else if (nodesById[item.parentId]) {
            nodesById[item.parentId].children.push(node);
        }
    });

    // 若includeRoot為true,回傳包含根節點的陣列;否則僅回傳根節點的子節點
    return includeRoot ? [root] : root.children;
}
4. 建立 產生HTML清單的方法
// [方法] 遞迴函數來建立HTML清單
function createMenuList(items) {
  const ul = document.createElement('ul');

  items.forEach(item => {
    const li = document.createElement('li');
    const a = document.createElement('a');
    a.href = item.url;
    a.textContent = item.label;
    li.appendChild(a);

    if (item.children && item.children.length > 0) {
      const childUl = createMenuList(item.children);
      li.appendChild(childUl);
    }

    ul.appendChild(li);
  });

  return ul;
}
6. 正式產生HTML清單
// 取得不包含 根結點 的選單
globalMenuList = buildMenuTree(mockData, false)
// 取得不包含 根結點 的選單
globalMenuList = buildMenuTree(mockData, true)


// 顯示Html結果
document.getElementById('menu').appendChild(createMenuList(globalMenuList));
7. 樹狀結構資料
[
  {
    "children": [
      {
        "children": [],
        "id": "2",
        "label": "使用者管理",
        "parentId": "1",
        "url": "subpage1/index"
      },
      {
        "children": [],
        "id": "3",
        "label": "權限管理",
        "parentId": "1",
        "url": "subpage2/index"
      }
    ],
    "id": "1",
    "label": "基本功能",
    "parentId": "0",
    "url": "homepage/index"
  },
  {
    "children": [
      {
        "children": [],
        "id": "5",
        "label": "債務試算",
        "parentId": "4",
        "url": "subpage1/index"
      },
      {
        "children": [
          {
            "children": [],
            "id": "7",
            "label": "列印",
            "parentId": "6",
            "url": "subpage2/index"
          }
        ],
        "id": "6",
        "label": "報表",
        "parentId": "4",
        "url": "subpage2/index"
      }
    ],
    "id": "4",
    "label": "進階功能",
    "parentId": "0",
    "url": "homepage/index"
  }
]

 學習計畫與備考心得: Module 3_@Hans-Tsai_https://static.coderbridge.com/img/Hans-Tsai/c20c209a1c23406f8e7803b99a7dfdc3.png)


